Bandsaw Speeds for the Shopsmith
February 29, 2016
A little while back I was trying to figure out how to get the shopsmith bandsaw to function properly. I was having issues because the bandsaw for the shopsmith is set up differently than most bandsaw models. The blade tracks differentlyand the set is just a bit off from most bandsaws made today. And shopsmith instructions are not very clear for the everyday user. Also, help to understand it is sparse and a little more technical than what is needed or can be understood for the average person that may be using the bandsaw.
I as well as many other have gotten frustrated trying to decipher the technical degrees and mathematics that so many people what to try and answer questions with. A lot of question that require a simple answer get more confusing because of a lot of people trying to speak engineering to people such as me who are doing good to be able to divide the fractions we need to cut. And in the end a lot of us who have a used shopsmith tool have cast the bandsaw attachment to the side simply because a lot of wanna be engineers seem to refuse are incapable of answering simple questions in simple everyday language.
I’m a stubborn man. I’ve been called bullheaded more times than I care to even try to add even if I did have a love for math along with engineering and physics degrees. Which I don’t. I’m just a redneck with a tool that I need to use and don’t feel the need to learn rocket science to use that tool which was supposed to have been designed for the weekend woodworker. I finally got the shopsmith bandsaw about figured out and working. I go into more detail about it in the video series. I’ll place the playlist down at the bottom.
One of the questions I have gotten asked most about the shopsmith bandsaw is what speed to run the bandsaw at. Which is actually a little more complicated than one would think. Even for those of us that choose not to over think and come up with complicated algebra formulas to cut a board. If the bandsaw blade is moving a little too fast for the size blade you are using in hardwood, you risk burning the wood. Too slow in softwood and you may get wobble in your cut, and other various results that are less than desirable.
So, with this in mind, I have compiled a basic speed chart and put it below. This is just an average idea of what speed to use on your shopsmith bandsaw for cutting. A starting point, so to speak to get you in the ballpark. It is always best to cut a test piece of wood and dial in and fine tune your speed to get the desired cut you want.
This chart does not go into the speeds for cutting metal and plastics because I don’t work with a lot of metal and when I do, I don’t use the shopsmith to cut it. From what little I’ve investigated, the lower speeds required for cutting metal can only be achieved on the shopsmith with a speed reducing attachment. I just don’t do enough metal work or work with plastic to justify purchasing one. I hope this information is helpful.
| |
|
|
|
|---|---|---|---|
| |
Softwood |
950 |
C |
| |
Softwood |
1000 |
Between C and D |
| |
Softwood |
1050 |
D |
| |
Softwood |
1050 |
D |
| |
Softwood |
1050 |
D |
| |
Softwood |
1100 |
between D and E |
How the Shopsmith Bandsaw Works
Redneck Know How Blog

Every fisherman has his or her own favorite techniques to catch this beloved fish. Why is crappie, (or pomoxis, if you want to get scientific), are so beloved? Well, they give one heck of a fight when caught. A 2 lb. crappie can put up a fight to rival a bass of larger size. So catching them is fun. There is also the taste factor. Fried crappie tastes great.

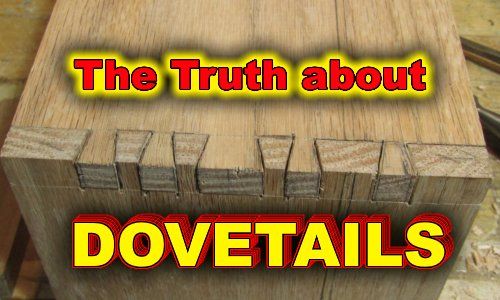
Everybody seems to be in love with dovetails these days. Myself included. They look nice, feel nice, and they make the woodworker feel an overwhelming since of pride when he makes tight and even. Especially the hand cut dovetails. Dovetail joints can be produced with power tools. And there are dovetail jigs you can buy and make. It makes getting precise dovetails with no gaps a lot easier. But nothing feels more satisfying than finally getting hand cut dovetails tight and gap free. And for the record, I use the term, “gap free”, very loosely. I’d wager that even the best woodworker gets gaps in their dovetails no matter how hard they try. Maybe not as many as us new to middlin’ woodworkers, and certainly not as noticeable, but there are gaps in their dovetails. Nowadays, people use dovetails not only as a joint, but as decoration. A showpiece if you will to show off the craftsmanship of the woodworker. But the reality is that they were not originally meant to be pretty. They were utilized to hold pieces that were heavily used together. Such as drawers or other parts of furniture and other items that were constantly pulled or tugged on. In the example below, you can see how the angles of the dovetails will keep the joint from coming apart during the tugging of the drawer when opening it. This part of the joint is where the dovetail joint get’s it’s name. Often when used on boxes, the orientation of those angles are switched around, placing them on the front of the box as a decoration, and the pins of the joint is put on the side. Great for looks, not so great for function. Of course for most smaller boxes, the function of the dovetail really isn’t needed and using dovetails for looks is fine and an anesthetically pleasing way to show off craftsmanship. But let’s not give up on using the dovetail joint for utilitarian purposes when building boxes too quickly. They can be a great way to join a bottom to a box that will be holding heavier stuff, such as tool boxes. The angle of the dovetails can manage the stresses of carrying heavier items such as tools if you wish to maintain a *NO screws or nails* policy on your woodworking projects. Or you can use the dovetail joint along with screws for extra protection against the bottom dropping out. So the purpose of the dovetail is a lot more than to just make your woodworking look good. In fact, long ago, they were hidden. Simply a way to join parts and give them the strength to do what the item was meant to do, and be hidden when the drawer was closed. Using the dovetail joint for decoration is a modern thing. Which I have nothing against. I love to show off dovetails I’ve made nearly perfect. Well, in my eyes anyway. Roy Underhill and Paul Sellers would likely just look at them and grin, maybe chuckle at me being so proud of something so far from the skill level they have achieved.


